エネルギー効率が良い車両デザインへの移行
Vehicle manufacturers have long been working to design and develop vehicles that tout superior fuel economy but are now beginning to shift their perspective to advancing electric vehicles to obtain an increase in overall vehicle energy efficiency. Fuel economy and emission regulations continue to become stricter in regional locations, but the overall procedure to design and develop energy efficiency advancements remains strongly based in simulation. Use of advanced simulation tools and libraries, like Modelon’s Vehicle Dynamics Library, enables efficient scenario testing, repeatable evaluations, and accurate results.
This blog post is a quick reference on how vehicle systems engineers can use Modelon’s Vehicle Dynamics Library to measure a vehicle’s energy efficiency for the benefit of advancing their vehicle’s design.
Step 1: Obtain the road-load coefficients
While the energy efficiency certifications take place in a full vehicle test rig attached to a dynamometer, the first step in the certification process is to acquire the road-load coefficients of the vehicle. This is a second-degree polynomial describing the combined loads from rolling resistance, bearing losses, friction, and aerodynamic resistance. The road-load coefficients are acquired using a coast-down test. This can either be done virtually when the losses are modeled, or it can be based on a physical test.
We can easily construct a coast-down experiment by initializing a vehicle at a certain speed. The wind speed is conveniently set to zero in our atmosphere component. By coasting the vehicle on a flat road in a straight line, we can determine the polynomial values for equivalent road-load coefficients describing the retarding force as a function of speed.

Step 2: Move the vehicle to a rig for dynamometer testing
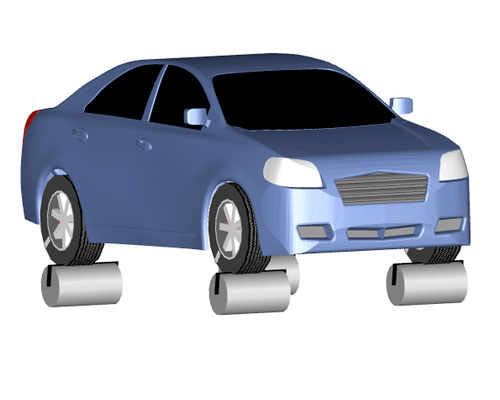
When moving a vehicle to a rig, either a two-wheel or four-wheel dynamometer can be used. Legislation usually requires compensations when using a two-wheel dyno because of reduced rotating mass. The first thing to do is to set up the dyno to the correct equivalent mass. On a real rig, this is done either by adding weights to the rollers, thereby affecting the rotational moment of inertia, or electronically by setting the appropriate parameters in the control software.
The coast-down experiment must also be run on the dynamometer rig. This is because the road-load coefficients include resistance, such as tire friction and driveline friction, that is still present when moving to the rig. We can derive new road load coefficients from this so that the dynamometer is tuned for the vehicle.
Step 3: Run a drive cycle
When the dynamometer has the correct road load polynomial set up for the vehicle, it is ready to run a drive cycle. Drive cycles are representations of driving scenarios. Some standard drive cycles are mandatory for testing energy efficiency. The architecture of Modelon’s Vehicle Dynamics Library makes it easy to evaluate the result of a component change on the results from the drive cycle test, be it range, fuel economy, or other performance measurements.
To represent city driving we use a UDDS cycle (Urban Dynamometer Driving Schedule) with and without a simple KERS system.
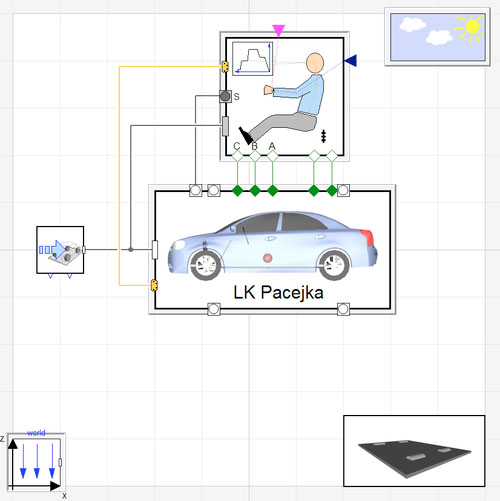
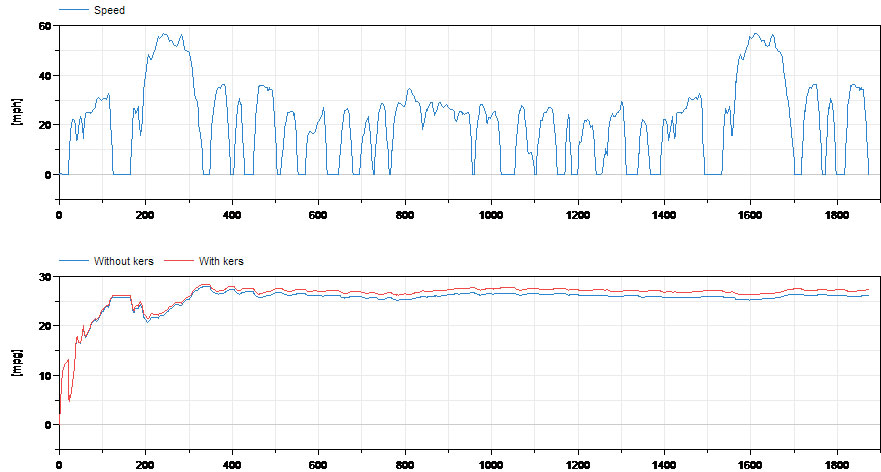
UDDS speed trajectory (upper), and cumulative fuel economy (lower).
The test procedure requires post processing, but it is already evident from our results that the addition of the energy storage device takes us a longer distance per unit of fuel. The post processing and generation of plots that must be submitted to demonstrate adherence to fuel economy and emissions standards can easily be automated using scripting.
Contact us to learn how you can use advanced simulation tools and libraries, like Modelon’s Vehicle Dynamics Library, to efficiently test scenarios, achieve repeatable evaluations, and obtain accurate results.

